Hostinger Next.js VPS Deployment: The Ultimate Guide 2026
Note: This is an adapted summary of our comprehensive deployment guide. Read the full Next.js Hostinger VPS Deployment Guide on PlannerPDFs for even more technical insights.The 2026 TL;DR Verdict: If you are still deploying high-traffic production Next.js applications on managed serverless platforms like Vercel or Netlify, you are likely burning cash. As your application scales, the “serverless tax” becomes exorbitant. By dedicating an afternoon to deploying on a Hostinger KVM VPS, you unlock enterprise-grade performance, entirely unmetered bandwidth, and absolute root control over your backend environment for a fraction of the monthly cost.
Introduction: The Serverless Trap vs. The VPS Freedom
Next.js has undeniably won the React framework wars. Its magical combination of Server-Side Rendering (SSR), Incremental Static Regeneration (ISR), and App Router architecture makes building blazingly fast web applications easier than ever. Because Next.js was created by Vercel, the default path for 99% of developers is to push their code to Vercel and let the platform handle the rest.
In the beginning, this is perfect. It’s free, seamless, and requires zero DevOps knowledge. However, as your user base grows, the reality of serverless architecture sets in. You start hitting execution timeouts on long-running API routes. Your background workers get killed prematurely. And most painfully, if you experience a traffic spike or ingest large media files, the bandwidth overage charges can be staggering. We call this the “serverless tax.”
The solution in 2026 is returning to the fundamentals: The Virtual Private Server (VPS). Specifically, Hostinger’s latest generation of KVM VPS plans. Powered by industry-leading AMD EPYC processors and ultra-fast NVMe storage, these servers handle Node.js workloads remarkably well. Unlike shared hosting, a VPS gives you a dedicated slice of hardware and full root SSH access. No artificial limits, no vendor lock-in, just pure, unadulterated computing power.
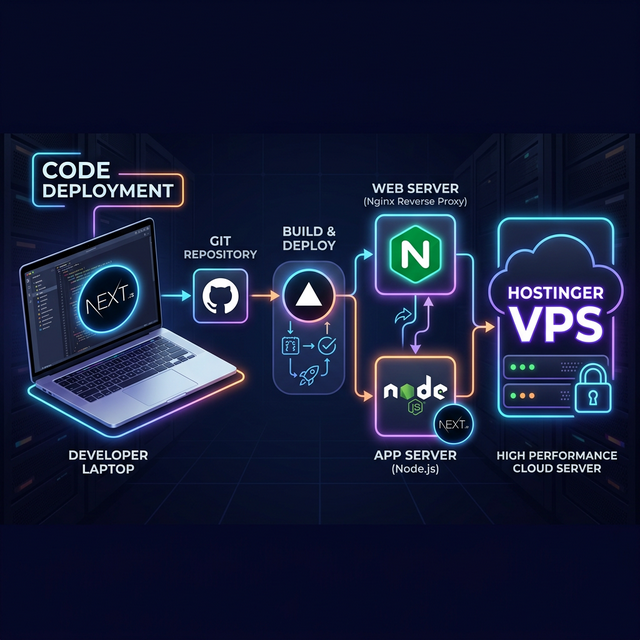
This massive guide will act as your definitive blueprint for taking a React/Next.js application and deploying it seamlessly onto a Hostinger VPS. We will cover every single step—from initial OS provisioning to configuring an Nginx reverse proxy, setting up PM2 for process management, and establishing an automated GitHub CI/CD pipeline. Grab a cup of coffee; we have a lot of ground to cover.
Step 1: Selecting and Provisioning Your Hostinger Hardware
Before we type a single command, we need to acquire the right hardware. Head over to Hostinger and navigate to their VPS hosting section.
Which plan should you choose? Next.js builds are incredibly memory-intensive. Webpack (which powers the Next.js compiler) can easily consume over 2GB of RAM when building a moderately sized application. Therefore, we highly recommend selecting at least the Hostinger KVM 2 plan (which provides 8GB of RAM and 2 vCPUs). If you attempt to build a Next.js app on a 1GB RAM machine, the build process will almost certainly crash with an `Out Of Memory` (OOM) error.
Choosing the Right Operating System
Once you’ve purchased your server, log into your Hostinger hPanel. You will be prompted to choose an Operating System template. While Hostinger offers various pre-configured panels (like cPanel or CyberPanel), we strongly advise deploying Next.js on a clean, raw OS. Control panels eat up valuable RAM and can conflict with custom Node.js port routing.
Select Ubuntu 24.04 LTS (64-bit). Ubuntu is the gold standard for server environments—it has massive community support, comprehensive documentation, and maximum compatibility with modern Node environments. Set a highly secure root password, save it in a password manager, and click install. In about three minutes, your server will be online and assigned a dedicated IPv4 address.
Step 2: Server Initialization and Security Foundations
It is time to access your server. Open your computer’s terminal (or PowerShell on Windows) and initiate an SSH connection using the IP address provided in your Hostinger dashboard:
ssh root@YOUR_SERVER_IPAccept the ECDSA key fingerprint prompt, enter your root password, and you are in. You now have total control over a remote Linux computer.
Updating the Package Repository
The very first command you should run on any new Linux server is an update of the Advanced Package Tool (APT) index to ensure you have the latest security patches:
apt update && apt upgrade -yPreventing Crashes with a Linux Swap File (Crucial Step)
Even with 8GB of RAM on the KVM 2 plan, Next.js builds can be unpredictable. To ensure your server never crashes
during an npm run build, we will create a Swap File. Swap space acts as overflow memory—when your
physical RAM is exhausted, the server temporarily uses your NVMe SSD as RAM. It’s slower, but it prevents fatal
crashes.
Let’s create a robust 4GB swap file:
fallocate -l 4G /swapfile
chmod 600 /swapfile
mkswap /swapfile
swapon /swapfile
echo '/swapfile none swap sw 0 0' | tee -a /etc/fstab
Your server is now crash-resistant during heavy compilation tasks.
Step 3: Installing the Node.js Ecosystem
Next.js apps run on Node.js. Do not install Node using the default Ubuntu package manager (`apt install nodejs`). It usually provides an outdated, legacy version of Node that will cause compatibility issues with Next 14+.
Instead, we will install NVM (Node Version Manager). NVM allows you to seamlessly install, manage, and switch between different versions of Node.js on the fly.
curl -o- https://raw.githubusercontent.com/nvm-sh/nvm/v0.39.7/install.sh | bash
source ~/.bashrc
nvm install --lts
The `–lts` flag ensures you install the latest Long Term Support version of Node.js. Verify the installation by
typing node -v and npm -v. Both commands should output version numbers.
Step 4: Cloning and Building Your Application
Your server is primed. Now, we need your code. It is highly recommended to host your code on a Git repository like GitHub, GitLab, or Bitbucket. We will install Git, clone your repository, and prepare the app.
apt install git -y
mkdir -p /var/www
cd /var/www
git clone https://github.com/yourusername/your-nextjs-repo.git myapp
cd myapp
If your repository is private, you will need to generate an SSH key on your Hostinger VPS (`ssh-keygen`) and add the public key to your GitHub account under “Deploy Keys”.
Now, install the exact dependencies listed in your `package.json` and execute the grueling production build process:
npm install
npm run build
Depending on the size of your application, this could take anywhere from 30 seconds to several minutes. This is where your AMD EPYC CPU and NVMe storage truly shine, accelerating the Webpack minimization process.
Step 5: Process Management with PM2
If you type npm run start right now, your Next.js app will launch perfectly on port 3000. However,
the exact moment you close your SSH terminal window, the process will die, and your website will go offline.
Furthermore, if the Hostinger server ever reboots for maintenance, your app will not come back online
automatically.
This is where PM2 (Process Manager 2) saves the day. PM2 is an advanced daemon process manager that will keep your Next.js application alive forever, automatically restarting it if it crashes, and launching it automatically on system reboots.
Install PM2 globally on your server:
npm install -g pm2Now, tell PM2 to start your Next.js application. We name the process “next_app” for easy identification later in the logs.
pm2 start npm --name "next_app" -- run startTo ensure PM2 launches your app whenever the Hostinger server reboots, run these two commands:
pm2 startup
pm2 save
You can monitor your application’s CPU and memory usage in real-time by typing pm2 monit.
Step 6: The Nginx Reverse Proxy Framework
Your Next.js app is now running flawlessly on port 3000 (e.g., `http://YOUR_SERVER_IP:3000`). But users do not type port numbers into their browsers; they expect web traffic to flow over standard HTTP (port 80) and HTTPS (port 443).
We cannot bind Next.js directly to port 80. Instead, we use an enterprise-grade web server called Nginx as a “reverse proxy”. Nginx will sit at the front door of your server (listening on port 80), receive incoming traffic for your domain name, and silently forward that traffic internally to Next.js on port 3000. Nginx is also incredibly efficient at caching static assets (like your Next.js optimized images and CSS), taking a massive load off the Node.js process.
Installing and Configuring Nginx
apt install nginx -yOnce installed, we need to create a custom server block configuration file for your domain. We will use the `nano` text editor:
nano /etc/nginx/sites-available/yourdomain.comPaste the following robust Next.js Nginx configuration into the file. Make sure to replace `yourdomain.com` with your actual domain:
server {
    listen 80;
    server_name yourdomain.com www.yourdomain.com;

    # Gzip compression for faster loading
    gzip on;
    gzip_proxied any;
    gzip_types text/plain application/xml text/css application/javascript;

    location / {
        proxy_pass http://localhost:3000;
        proxy_http_version 1.1;
        proxy_set_header Upgrade $http_upgrade;
        proxy_set_header Connection 'upgrade';
        proxy_set_header Host $host;
        proxy_cache_bypass $http_upgrade;

        # Real IP Forwarding
        proxy_set_header X-Real-IP $remote_addr;
        proxy_set_header X-Forwarded-For $proxy_add_x_forwarded_for;
        proxy_set_header X-Forwarded-Proto $scheme;
    }

    # Highly aggressive caching for Next.js static assets
    location /_next/static {
        proxy_pass http://localhost:3000;
        proxy_cache_valid 200 365d;
        expires 365d;
        access_log off;
    }
}
Save and exit nano (Ctrl+O, Enter, Ctrl+X). Now, enable the site by creating a symlink to the `sites-enabled` directory, check the syntax for errors, and restart Nginx:
ln -s /etc/nginx/sites-available/yourdomain.com /etc/nginx/sites-enabled/
nginx -t
systemctl restart nginx
Point your domain’s DNS A-Record to your Hostinger VPS IP address. Once DNS propagates, navigating to `yourdomain.com` will magically display your Next.js application!
Step 7: Imporving Security with Let’s Encrypt SSL and UFW
In 2026, an HTTP site without an SSL certificate is dead on arrival. Google will penalize your SEO, and modern browsers will throw massive security warnings at your users. Thankfully, the Electronic Frontier Foundation provides free, auto-renewing SSL certificates via Certbot.
apt install certbot python3-certbot-nginx -y
certbot --nginx -d yourdomain.com -d www.yourdomain.com
Certbot will automatically communicate with Let’s Encrypt, verify your domain ownership, issue the cryptographic certificates, and rewrite your Nginx configuration to force all HTTP traffic over secure HTTPS (port 443).
Firewall Configuration (UFW)
Never leave a VPS exposed to the open internet. We will use the Uncomplicated Firewall (UFW) to lock down the server. We only want to allow SSH (for our administration), HTTP, and HTTPS traffic. All other ports (including port 3000) should be blocked to the outside world.
ufw allow OpenSSH
ufw allow 'Nginx Full'
ufw enable
Type `y` when prompted to enable the firewall. Your server is now fortified against basic probing attacks.
Bonus Step: Automating Deployments with GitHub Actions
You have successfully deployed your application, but repeating this process every time you change a line of code is tedious. True production environments use Continuous Integration and Continuous Deployment (CI/CD).
By creating a `.github/workflows/deploy.yml` file in your repository, you can instruct GitHub Actions to automatically SSH into your Hostinger server, pull the latest code, run `npm run build`, and execute `pm2 reload next_app` whenever you push code to the `main` branch. This provides a “Vercel-like” auto-deploy experience while maintaining the raw power and cost-efficiency of your Hostinger VPS.
Related Reading on Core Web Vitals & Hosting
If you are exploring other JavaScript frameworks or backend architectures, be sure to read our other technical deep-dives:
Final Verdict
Migrating away from restrictive serverless environments to a dedicated Hostinger VPS might seem daunting initially, but the long-term benefits are staggering. You gain infinite scalability, eliminate bandwidth anxiety, and maintain complete architectural control over your Next.js application.
The combination of Ubuntu, Nginx, PM2, and Hostinger’s NVMe hardware creates an incredibly resilient, high-performance stack that can handle millions of monthly visitors for mere dollars a month. It is, without a doubt, the smartest infrastructure decision a growing startup can make in 2026.